

Watercolor painting is one of the most rewarding and versatile art forms, but it can also be one of the most challenging to master. In this comprehensive guide, we'll explore essential techniques that will help you create stunning watercolor paintings and develop your unique artistic voice.
Understanding Your Materials
Before diving into techniques, it's crucial to understand the materials you'll be working with. The quality of your tools can significantly impact your results and experience.
Watercolor Paper
The foundation of any watercolor painting is the paper. Look for 100% cotton, acid-free paper with a weight of at least 140lb (300gsm). Paper comes in different textures:
- Hot Pressed: Smooth surface, ideal for detailed work
- Cold Pressed: Medium texture, versatile for most techniques
- Rough: Heavily textured, creates interesting effects with washes
Brushes
Invest in a few quality brushes rather than many mediocre ones. Essential brushes include:
- A large round brush (size 10-12) for washes
- A medium round brush (size 6-8) for general painting
- A small round brush (size 2-4) for details
- A flat brush for even washes and geometric shapes
Paints
Artist-grade watercolors contain more pigment and fewer fillers than student-grade options. Start with a limited palette of primary colors plus a few earth tones, and expand as needed. Remember that with watercolors, you can mix most colors from a small selection of primaries.
Essential Watercolor Techniques
1. Wet-on-Dry
This foundational technique involves applying wet paint to dry paper. It creates crisp, defined edges and is excellent for detailed work and layering.
How to practice: Using your small or medium round brush, paint simple shapes on dry paper. Notice how the paint stays exactly where you place it, creating defined edges.
Wet-on-Dry Example:
Perfect for creating defined shapes, detailed work, and layering. This technique gives you the most control over your paint placement.

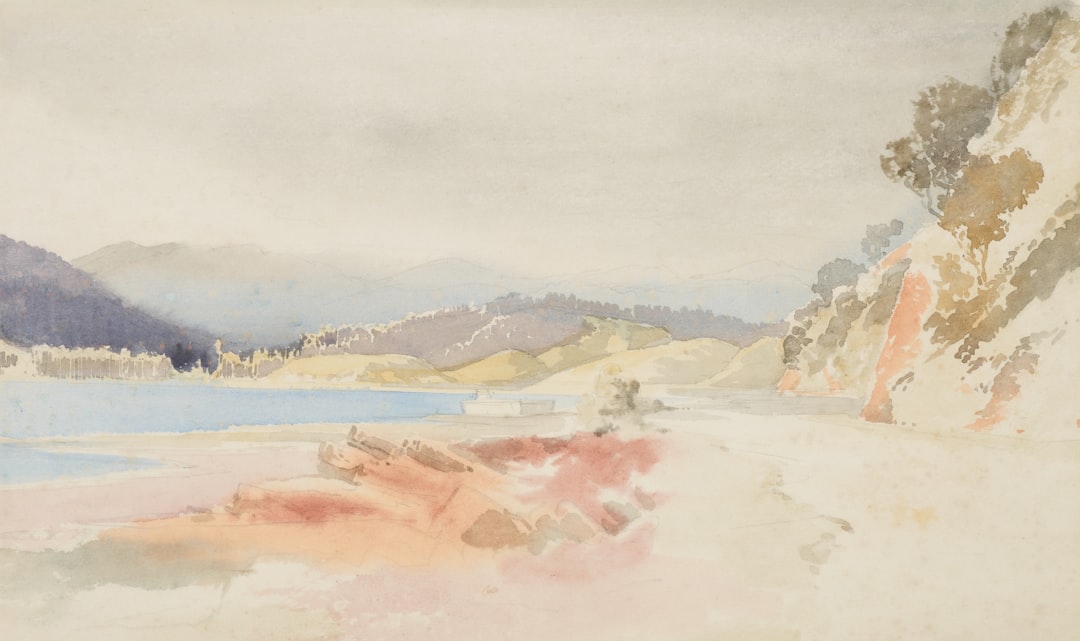
2. Wet-on-Wet
This technique involves applying wet paint to wet paper, creating soft, diffused effects as colors blend together. It's ideal for creating atmospheric backgrounds, skies, and soft transitions.
How to practice: Wet an area of your paper with clean water, then drop in colors and watch them blend and diffuse. Try different levels of moisture to see how it affects the spread.
Wet-on-Wet Example:
This technique creates soft, diffused effects perfect for skies, water, and atmospheric backgrounds. The amount of water on your paper will determine how much the colors spread.
3. Glazing
Glazing involves applying thin, transparent layers of paint, allowing each to dry before adding the next. This builds depth and luminosity in your paintings.
How to practice: Paint a light wash and let it dry completely. Then apply another wash over it. Repeat several times, observing how colors interact and create new hues when layered.
4. Dry Brush
Using a brush with minimal moisture and paint, drag it across the textured surface of your paper. This creates a broken, textured effect perfect for rendering rough surfaces like bark, rocks, or grass.
How to practice: Load your brush with paint, then remove most of the moisture on a paper towel. Lightly drag the brush across your paper, letting the texture create broken strokes.
Color Mixing and Management
Watercolor's transparency means that color mixing works differently than in other mediums. Here are some key principles:
Creating Clean Mixes
To avoid muddy colors, limit your mixes to 2-3 colors at most. When mixing complementary colors (those opposite on the color wheel), do so sparingly as they tend to create neutrals and browns.
Understanding Values
Value (the lightness or darkness of a color) is crucial in watercolor. Practice creating value scales with your colors by gradually adding more water to dilute the pigment.
Preserving Whites
In watercolor, the white of the paper provides your highlights. Plan your painting to preserve these areas, or use masking fluid to temporarily protect areas that should remain white.
Pro Tip: Creating Luminous Paintings
For that characteristic watercolor glow, work from light to dark and preserve the white of your paper for the brightest highlights. Start with pale washes and gradually build up to your darkest values, allowing each layer to dry completely before adding the next.
Common Challenges and Solutions
Blooms and Backruns
These occur when water or paint flows into a damp area that's beginning to dry, creating a "cauliflower" effect.
Solution: Either embrace these as part of watercolor's charm, or prevent them by ensuring areas are either completely wet or completely dry before adding more paint.
Muddy Colors
Solution: Limit your palette, clean your brush thoroughly between colors, and avoid overworking an area.
Paper Buckling
Solution: Use heavier weight paper (300gsm+) or stretch your paper before painting by soaking it and taping it to a board.
Putting It All Together: A Simple Project
Let's apply these techniques to a simple landscape painting:
- Start with a wet-on-wet sky, blending blues and perhaps touches of purple or pink for sunset/sunrise effects.
- While the sky dries, plan your composition for the foreground elements.
- Add distant hills using a wet-on-wet technique with diluted paint for an atmospheric perspective.
- Use wet-on-dry for mid-ground elements like trees or buildings, defining their basic shapes.
- Add foreground details with more saturated colors and a combination of wet-on-dry and dry brush techniques.
- Once everything is dry, add final details and highlights with precise, wet-on-dry strokes.
Final Thoughts
Mastering watercolor is a journey, not a destination. These techniques provide a foundation, but your unique style will develop through consistent practice and experimentation. Embrace watercolor's unpredictable nature and let it guide you to discover effects that can't be achieved in any other medium.
Remember that even professional artists face challenges with watercolor—it's part of the medium's charm. Keep practicing, stay patient, and most importantly, enjoy the process of creating with this magical medium.
Recommended Resources
- "Watercolor Painting: A Comprehensive Approach to Mastering the Medium" by Thomas Schaller
- "The Complete Watercolorist's Essential Notebook" by Gordon MacKenzie
- "Watercolor Secrets" by Shirley Trevena

Comments
Join the conversation! Log in or sign up to leave a comment.